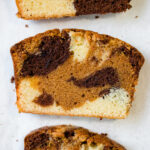
Chocolate, Dulce de Leche and Vanilla Marble Cake
Ingredients
- 170 g (1½ sticks/6 oz.) unsalted butter, at room temperature
- 1 ½ cups (300g) granulated sugar
- 60 g (2¼ oz.) semisweet or bittersweet chocolate, chopped
- ¼ cup (80g) dulce de leche
- 3 large eggs
- 1 ½ cups (210g) all-purpose flour
- ½ teaspoon salt
- ¼ teaspoon baking powder
- ½ cup (120 ml) sour cream or buttermilk (heavy cream works great, too)
- 1 tablespoon Dutch process cocoa powder
- 2 teaspoons pure vanilla extract
Instructions
-
Preheat the oven to 300ºF/150ºC. Grease well a 8.5x4.5-inch loaf pan (a 9-inch loaf pan works, too) with butter or cooking spray. You can line the pan with parchment paper so it'll fit in the cake pan with overhanging edges (overhanging the longer sides) which will help you get the cake out later.
-
In the bowl of a stand mixer fitted with the paddle attachment, beat the butter and sugar on medium high speed until light and fluffy, about 5 minutes, stopping to scrape down the sides of the bowl as needed.
-
While the butter and sugar are beating, put the chopped chocolate in a medium bowl and set it over a pan of barely simmering water, stirring gently until smooth and melted. Turn off the heat and place aside.
-
Put the dulce de leche in a medium bowl and heat it in the microwave for about 30 seconds until it's soft and fluid.
-
When the butter and sugar is light and fluffy, Add the eggs one at a time with the mixer on medium speed, stopping the mixer to scrape down the sides of the bowl after each addition. Whisk together the flour, salt, and baking powder in a small bowl.
-
Using a spatula, mix one-third of the dry ingredients into the butter mixture just until it's almost all mixed in. (Don't overbeat the batter when adding any of the ingredients during this step) Stir in half of the sour cream or buttermilk, then half of the remaining dry ingredients. Add the rest of the sour cream or buttermilk then the rest of the dry ingredients, stirring just until everything is incorporated, but no more.
-
Divide the batter into three portions; put one third (about 1 and ⅓ cups or 300 grams) in the bowl with the melted chocolate and stir them together along with the cocoa powder. Add another third of the batter in the bowl with the dulce de leche and stir until combined. Stir the vanilla extract into the remaining one-third of the batter in the mixing bowl. Be careful not to overmix.
-
Using an ice cream scoop or 2 tablespoons (using one spoon to scoop up the batter and the other to scrape it off, to release it and drop it into the loaf pan), make five rows of chocolate and vanilla batter side-by-side in an alternating pattern down both sides of the pan (as shown in the post). Add scoops of the dulce de leche batter down the center of the pan.
-
Working to create a checkerboard, for the next layer, put scoops of chocolate batter over the scoops of vanilla batter in the pan, then put scoops of dulce de leche batter over the scoops of chocolate batter in the pan. Finish (well, almost!) with scoops of vanilla batter down the center of the pan. Place scoops of leftover batters randomly on top. Tap the pan lightly on the counter to settle the batters.
-
Use a toothpick or butter knife to run it through the batter about seven times, so they're mingling with each other (but don’t overdo it).
-
Bake the cake until the center is just set and a toothpick inserted into the center comes out clean, about 1 hour and 30 minutes.
-
Allow the cake to cool for 15 minutes in the pan, then use the parchment to lift the cake out of the pan and cool on a wire rack. Serve cake at room temperature.
-
Store cake for 2-3 days in the refrigerator. Serve at room temperature. The cake also freezes well. Thaw overnight in the fridge or for a couple of hours at room temperature.
Recipe Notes
Recipe is adapted from David Lebovitz, and originally printed in Bake from Scratch Magazine, in their Fifth Anniversary Issue (Sept/Oct 2020) .