This chocolate peanut butter mousse cake is rich, creamy and requires no baking or gelatin! Made with a crunchy chocolate cookie crust, it has amazing texture and tastes incredible.
Chocolate and peanut butter is one of those classic flavor combos that never gets old. Creamy peanut butter and rich chocolate will always be one of my favorites, whether I’m eating a simple Reese’s peanut butter cup or decadent chocolate peanut butter lava cake.
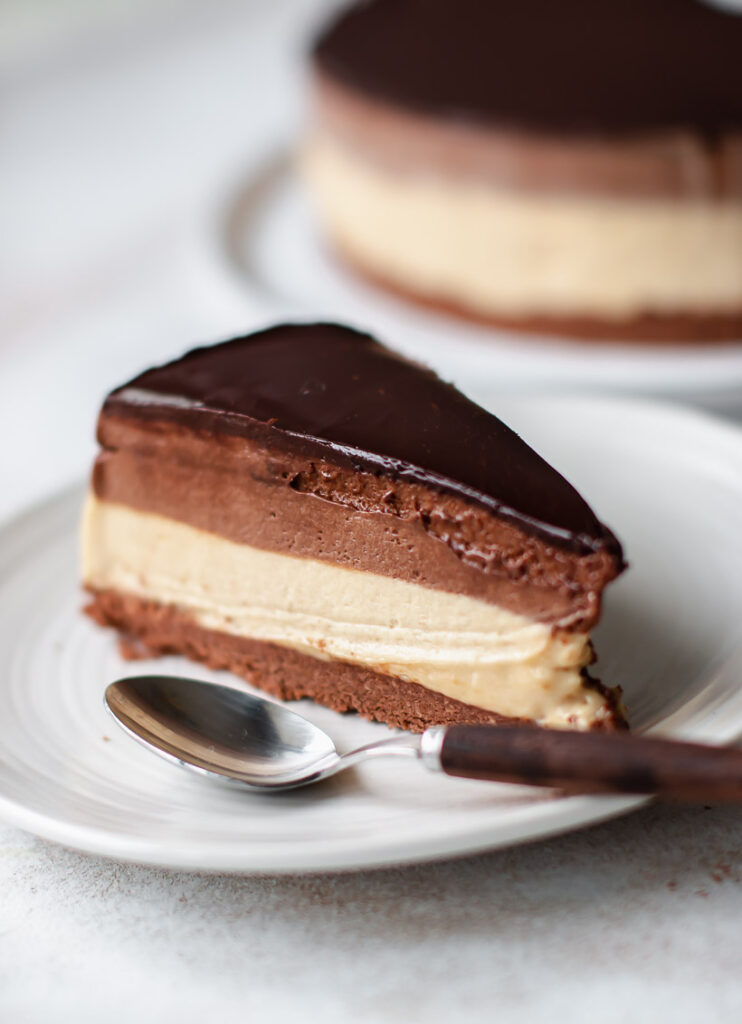
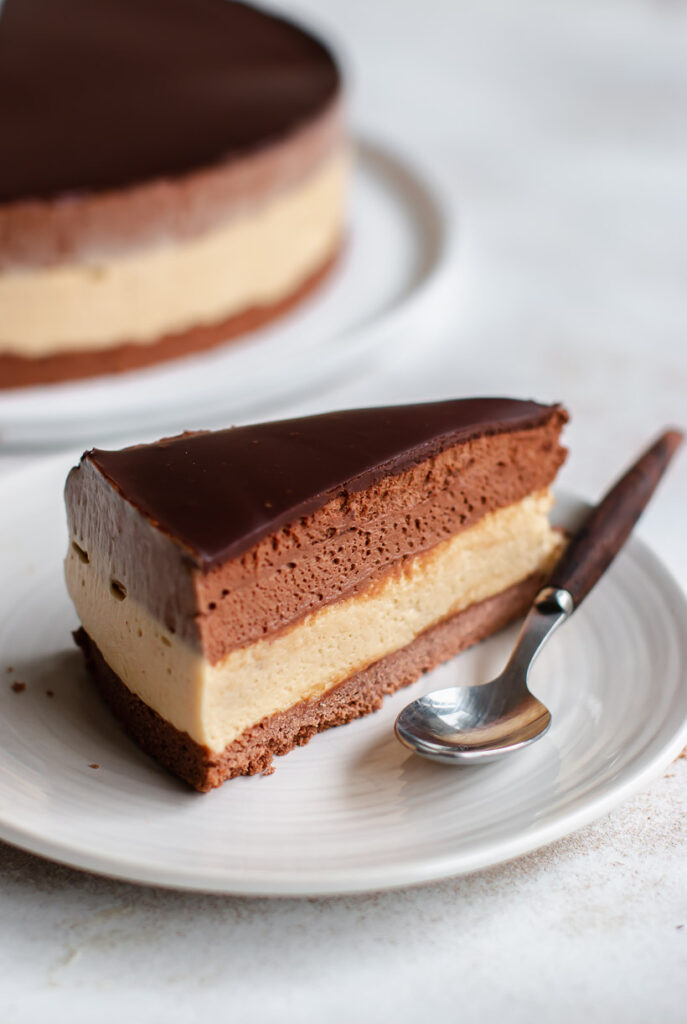
This chocolate peanut butter mousse cake is my adapted version of Tish Boyle’s recipe from The Cake Book. It’s made without gelatin, requires no baking, and is definitely a grown-up dessert using the nostalgic flavors of chocolate and peanut butter that I love so much. Made with crunchy, buttery chocolate cookie crust and layers of chocolate and peanut butter mousse, it’s all topped with a layer of smooth and rich chocolate ganache glaze for a seriously delicious cake.
Is your mouth watering yet?
How to make chocolate peanut butter mousse cake
This cake has four layers:
- Chocolate cookie crust
- Peanut butter mousse
- Chocolate mousse
- Chocolate ganache glaze
Start by making the chocolate cookie crust
- Lightly grease a 9-inch springform pan.
- Combine chocolate cookie crumbs with melted butter until the texture resembles wet sand.
- Firmly press the cookie crumbs into the bottom of the pan, packing them together to form a crust.
- Place the pan in the refrigerator so the crust can set while you make the peanut butter mousse.
Note: You don’t need to bake the crust, but baking will help solidify it and make it a bit crunchier. If you want to do this, bake the crust for 6-7 minutes in a preheated 350°F oven and allow it to cool completely before adding the mousse layers. I prefer doing this when I have the time, but if you skip this step the crust will still solidify well in the refrigerator.
Make the peanut butter mousse
- Beat the cream cheese and butter together. In the bowl of an electric mixer fitted with the paddle attachment, beat the cream to soften it for about a minute. Add the softened butter and beat together until creamy.
- Add sifted powdered sugar. Combine completely.
- Incorporate the creamy peanut butter and salt. Beat together until the mixture is completely emulsified.
- Whip the cream. In a separate bowl, whip the all of the cream until soft peaks form. Fold 2.5 cups of the whipped cream into the peanut butter mixture and reserve the rest in the refrigerator for the chocolate mousse.
- Layer the peanut butter mousse. Pour the peanut butter mousse on top of the crust and spread evenly using a knife or spatula. Place the cake in the refrigerator to chill while you make the chocolate mousse.
Tip: If the mousse appears clumpy, you can either strain it using a fine mesh strainer or blend it together using an immersion blender or standing blender. The lumps are most likely because the cream cheese wasn’t soft enough – but not to worry, this is easily fixable!
Make the chocolate mousse
- Melt the chocolate and milk together. Place both the dark and milk chocolates in a microwave-safe bowl with the whole milk. Heat in 30-second increments or on the stove using a double boiler until melted. Then, mix in the vanilla extract.
- Fold in the remaining cream. Fold in the reserved whipped cream with a rubber spatula and layer on top of the peanut butter mousse.
- Chill. Cover the cake loosely and place in the freezer for one hour.
Would you like to save this recipe?
Note: It’s important for the mousse cake to chill before glazing so the mousse doesn’t melt when the glaze is poured on top.
Make the chocolate ganache glaze
- Make the chocolate ganache glaze. In the microwave, melt the chocolate and heavy cream together in 30-second increments, mixing between each increment until completely melted.
- Pour on top of the cake. Slowly pour the ganache on top of the chocolate layer, using a knife to spread even.
- Chill. Place the entire cake in the refrigerator to chill for at least 6 hours before serving.
- Release the cake from the springform pan. Run a knife under hot water and dry it. Then, slide the heated knife between the cake and the inside of the pan to release it. Slowly remove the sides of the pan.

Tips for making chocolate peanut butter mousse cake
- Chill each layer before adding the next. To create beautifully even and distinct layers, it’s important to chill each layer before adding the next so they don’t mesh together.
- Use good quality chocolate for the chocolate mousse. The better quality your chocolate, the better the mousse will taste.
- Blend the peanut butter mousse if it appears clumpy. This can happen if the cream cheese wasn’t soft enough or if you don’t sift the powdered sugar. But not to worry – you can strain it using a fine mesh strainer, or blend it using an immersion blender or standing blender until the clumps disappear (my preferred method – it really gets rid of all the lumps).
- Keep the cream in the refrigerator before whipping it to soft peaks. Cream whips up much better when it’s cold. After you’ve folded half into the peanut butter mousse, store the rest in the fridge to keep it cold so it’s chilled when you are ready to fold it into the chocolate mousse.
- Allow the cake to chill for several hours before serving. This will help the mousse solidify completely so it’s sliceable.
Commonly asked questions
What kind of peanut butter should I use?
I recommend using a creamy, non-natural peanut butter, like Jif or Skippy. It’s thicker than natural peanut butter and contains sugar and salt already, which adds flavor.
How long will the cake stay fresh?
This cake will stay fresh for 5 days in the fridge, just be sure to keep it covered.
Can I freeze chocolate peanut butter mousse cake?
Yes. Wrap the cake up in a freezer-safe container or double wrapped in plastic wrap. It will stay fresh for up to 2 months. To thaw, place in the fridge overnight.
Why doesn’t this mousse cake need gelatin?
This mousse cake is stabilized with enough whipped cream that gelatin isn’t necessary.

More of my favorite no-bake desserts
- No-Bake Chocolate Tart: Made with an Oreo cookie crust and rich chocolate ganache filling.
- Chocolate-Nutella Banana Tart: Crunchy, creamy, rich, and made with fresh bananas.
- White Chocolate Strawberry Tart: Made with luscious, delicate white chocolate mousse and fresh strawberries.
- No-Bake Nutella Cheesecake: For true chocoholics only, this is one of my favorite cheesecakes.
- No-Bake Cheesecake: Rich, creamy, and full of flavor.
Chocolate Peanut Butter Mousse Cake
This decadent, no-bake chocolate peanut butter mousse cake is made with layers of crunchy, buttery chocolate cookie crust, fluffy peanut butter mousse and rich chocolate mousse. It's topped with satiny smooth chocolate ganache glaze and tastes absolutely incredible!
Ingredients
Chocolate cookie crust
- 1 ¾ cups (170g) chocolate wafer or chocolate digestive biscuit crumbs
- 6 tablespoons (85g) unsalted butter, melted
Peanut butter mousse
- ½ cup (120g) full-fat cream cheese, softened
- 2 tablespoons unsalted butter, softened
- 1 ¼ cups (145g) powdered sugar, sifted
- ¾ cup (200g) creamy peanut butter, such as Jif or Skippy
- ¼ teaspoon salt
- 2 ½ cups (600 ml) heavy cream (for both the peanut butter and chocolate mousse)
Chocolate mousse
- 5 oz (140g) bittersweet chocolate, coarsely chopped
- 3.5 oz (100g) milk chocolate, coarsely chopped
- ⅓ cup (80 ml) whole milk
- 1 teaspoon pure vanilla extract
Chocolate ganache glaze
- 4 oz (120g) bittersweet chocolate, coarsely chopped
- ½ cup (120 ml) heavy cream
Instructions
-
Lightly grease the bottom and sides of a 9-inch springform pan that's at least 3-inches high.
-
Make the crust: Combine cookie crumbs and melted butter in a medium-sized bowl and mix until combined and moistened. Press the mixture firmly into the bottom of the pan. Place in the fridge to chill while you make the peanut butter mousse. (Note: While it's not required, you can bake the crust for 7-8 minutes in a preheated 350°F/180°C oven. This helps the crust solidify and makes it crunchier. After baking, allow it cool completely on a wire rack before adding the peanut butter mousse filling).
-
Make the peanut butter mousse: In an electric mixer bowl fitted with a paddle attachment, beat cream cheese on medium-high speed until fluffy. Add the softened butter and combine until creamy, about 1 minute. Add powdered sugar and beat until combined and fluffy. Beat in peanut butter and salt. Set aside.*
-
In an electric mixer fitted with the whisk attachment or using a handheld mixer, whisk heavy cream until soft peaks form; they should hold their shape but have a soft texture. Using a spatula, gently fold 1 cup of the whipped cream into the peanut butter mixture, then fold in another 1.5 cups.
Note: there will be leftover whipped cream for the chocolate mousse. Cover and place in the fridge to keep cold until ready to use.
-
Scrape the peanut butter mousse on top of the crust and smooth into an even layer. Refrigerate while you make the chocolate mousse.
-
Make the chocolate mousse: Place the bittersweet and milk chocolates along with the milk in a microwave-safe bowl. Microwave in 30-second increments, stirring between each interval until melted. Alternatively, you can do this on the stove in a double boiler. Stir in the vanilla extract and allow to cool for 5 minutes.
-
Gently fold in half of the remaining cream with a rubber spatula, then fold in the other half. Pour on top of the peanut butter mousse layer and smooth into an even layer. Cover loosely and place the cake in the freezer or fridge for one hour.
-
Make the chocolate ganache glaze: Place chocolate and cream in a microwave-safe bowl and heat in 30-second increments, stirring in between each until fully melted. Pour the glaze on top of the cake, using a knife to spread evenly.
-
Cover pan loosely with plastic wrap and place in the fridge for at least 6 hours, or until completely set, before serving.
-
Release the cake from the pan: Run a knife under hot water and dry it. Then, slide the heated knife between the cake and the inside of the pan to release it. Slowly remove the sides of the pan. Serve the cake cold.
-
Chocolate mousse cake will keep for up to 5 days in the fridge.
Recipe Notes
*If the mousse appears clumpy, you can either strain it using a fine mesh strainer or blend it together using an immersion blender or standing blender. The lumps are most likely because the cream cheese wasn’t soft enough – but not to worry, this is easily fixable!
Lola says
Do you think I could replace the peanut butter with caramel or Nutella instead? Same results?
Talia @ Pretty. Simple. Sweet. says
Hi Lola, I don’t think caramel is a good option because it’s much more viscous than peanut butter and the mousse won’t set. Nutella could work, but you might need to add more whipped cream to stabilize it and you would probably want to reduce the powdered sugar slightly. I haven’t tested this recipe with either of these so I can’t say for sure what the results will be.
Stefania says
Can I freeze it?
Stephanie @ Pretty.Simple.Sweet. says
Hi Stefania, I haven’t tried freezing this cake yet, but I imagine it would freeze quite well.
Rosemarie MacFarlane says
LOVE this recipe. I was wondering if I could pre-cut slices, after it is complete, or, should I freeze first over night and then cut slices? This will be the second time I make this, and it is definitely a welcoming family favourite.
Trying to save steps, at serving time!
Stephanie @ Pretty.Simple.Sweet. says
Hi Rosemarie,
If you precut slices, you’ll still have to figure out how to store them in an airtight container in the fridge. If you have the right airtight container (like a cake caddy or similar?) and enough fridge space, this is totally fine. I recently pre-cut my cheesecake slices and froze them the night before I took them on a two hour road trip. By the time I arrived at the party, the cheesecakes were perfectly thawed and already sliced. The mousse cake will not be as firm as the cheesecake, so it’s really up to you! I find that the slices of mousse cake look the best if I cut right before serving.
Brigitta says
Hi! This recipe looks delicious but I am wondering if you can clarify some contradictory statements. Up top you mention to fold in 1.5 cups of the whipped cream into the peanut butter mixture but below in the recipe steps it states fold in 1 cup then fold in another 1.5 cups and set aside the remaining for the chocolate mouse. You also only include the vanilla extract for the chocolate mouse but then mention to add vanillin extract into the peanut butter mixture. Is should that amount mentioned in the ingredients be divided or should more be added for the peanut butter mixture? Any clarification for the questions would be greatly appreciated! Thanks!
Stephanie @ Pretty.Simple.Sweet. says
Hi Brigitta, thank you for the question! I’m happy to clarify. The 2.5 cups of heavy whipping cream will just about double when whipped so you’ll have approximately 5 cups of whipped cream. 2.5 cups will go into the peanut butter mousse and 2.5 cups will go into the chocolate mousse. Only the chocolate mousse needs vanilla extract- that was my mistake and I have corrected it.