Buttery, crisp and flaky, this is a good old-fashioned pie crust recipe. Also known as pate brisee in French, this easy pie crust recipe is simple to make and tastes way better than store-bought.

Everyone has their own favorite pie crust. I like mine buttery, crisp, and flaky. This one is an old, simple recipe that I’ve been using for as long as I can remember and it never fails me. When it comes to pies, I use this recipe almost every time. It’s perfect for those classic pies like cherry pie and apple pie but is incredibly versatile – add a pinch of cinnamon or orange zest to change the flavor however you like!
Scroll down for a step-by-step guide with photos.

Tips for making perfect pie crust
- It’s important to use very cold ingredients when making the dough. Cut the butter into small cubes, then put it in the freezer for 15 minutes. Same for the water and flour – measure the amount you need and place in the freezer to chill. For the water, you could alternatively add some ice cubes, but keep in mind that if you’ve already measured the water, ice cubes melt and will add more liquid.
- Cold ingredients are important because the longer you work with the dough, the warmer and stickier it gets, the more the butter melts, and the harder it will be to work with it. That’s also why you must chill the dough for at least 30-60 minutes before rolling it out, and to be as quick as possible whenever you’re working with the dough.
- Stick to butter instead of shortening. Some recipes contain shortening in addition to butter, which results in a flakier crust, but I use all butter in my recipe for the best flavor. I don’t like to take shortcuts when it comes to my pies :).
- Be careful not to over process the dough. The more you mix it, the more gluten is formed, which results in a tougher crust. This is why I don’t add the water into the food processor to combine with the flour-butter mixture – once you add water to flour and start mixing, gluten starts to form. Combining the water with the butter-flour mixture in the food processer overmixes the dough, and creates tough, dense pie crust. We don’t want that; we want a dreamy, flaky, crisp texture.
- Chill your dough before rolling it out. Otherwise, the butter will start to melt and the dough will be too sticky to work with.
Would you like to save this recipe?
_______________________________________________
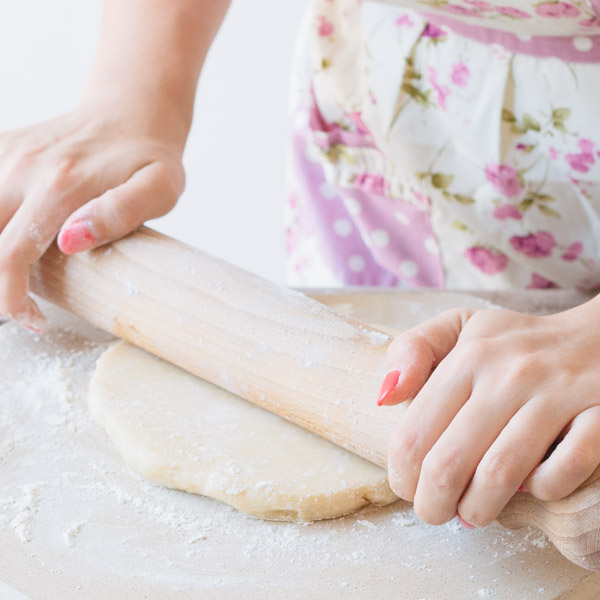
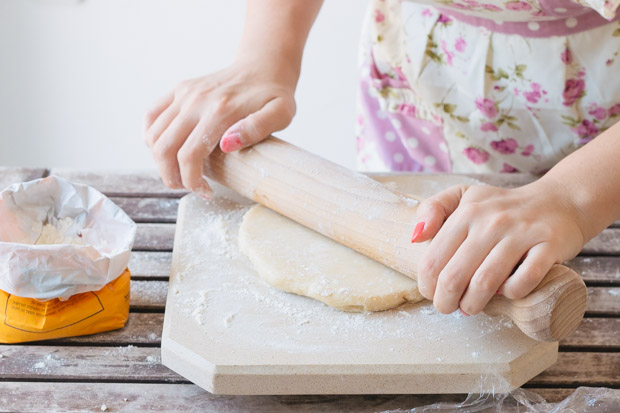
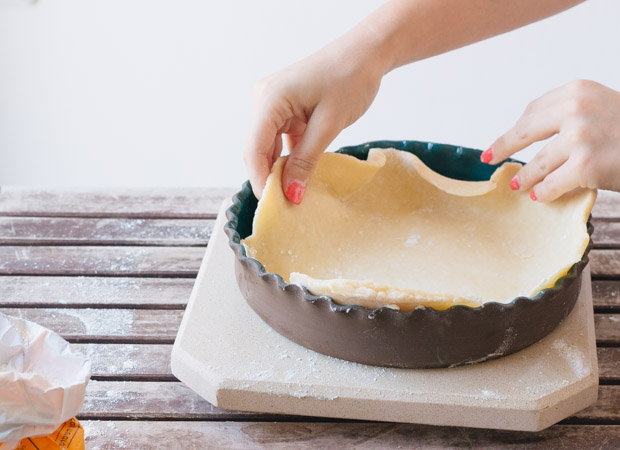
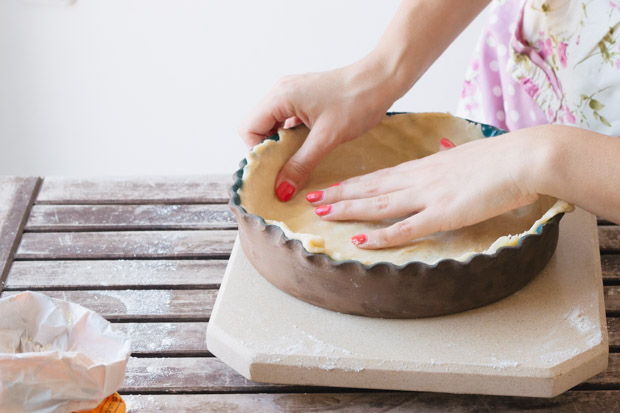
How to make perfect, easy pie crust
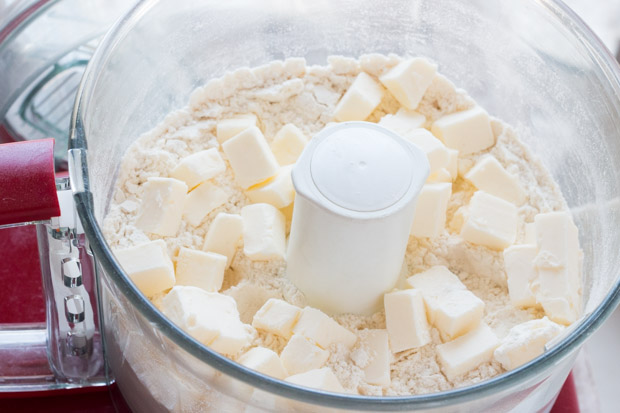
Start by processing flour and sugar in a food processor for a few seconds until combined. You can also do the whole process by hand, using a pastry cutter or even 2 forks. Add cold butter and pulse until the mixture becomes crumbly and resembles coarse meal, about 15 pulses.
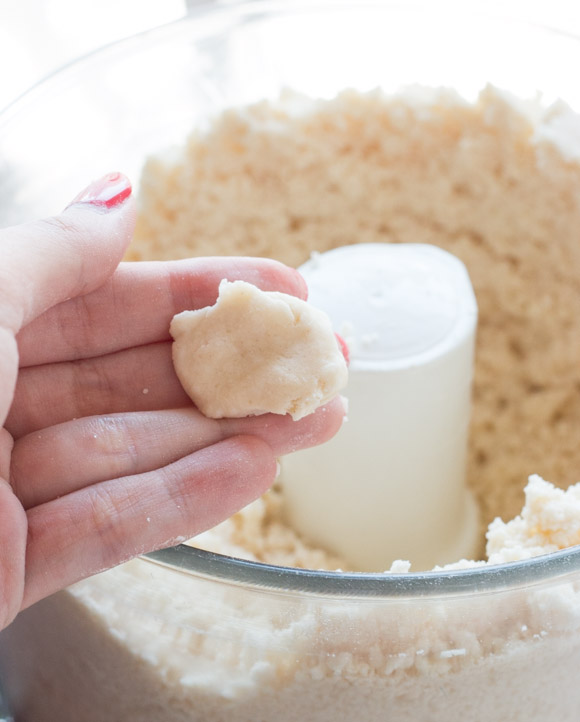
Remove the mixture from the food processer and pour into a bowl. Add ¼ cup very cold water, starting with 1 tablespoon and increasing as necessary until the dough comes together. Many times I just use my hand to combine the ingredients together, and the dough should be quite crumbly with large clumps. You don’t want it to be too wet.
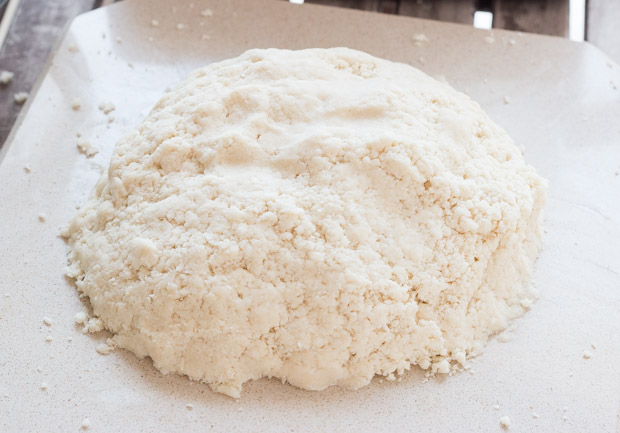
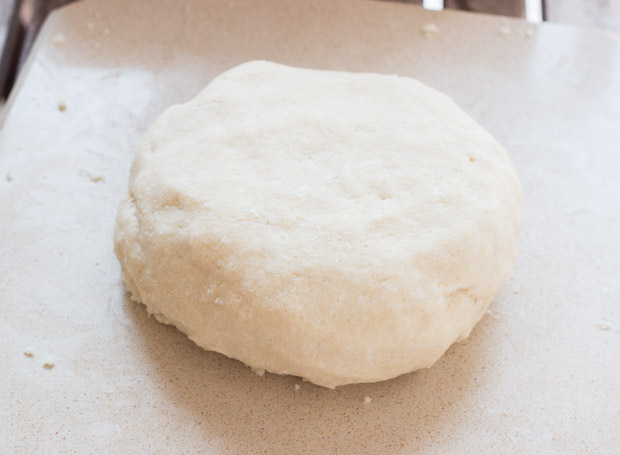
Turn the dough to a floured surface and form into a ball. It should come together easily without being sticky.
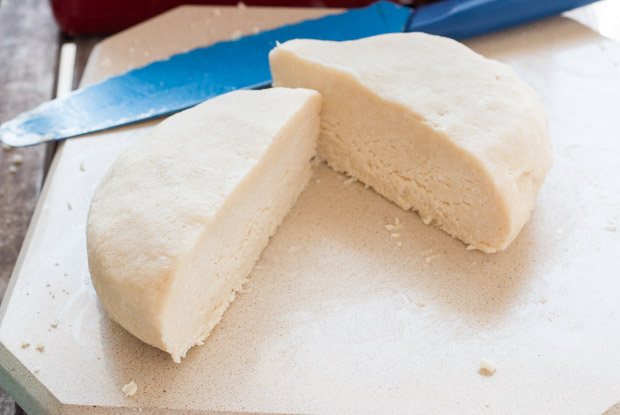
Divide the dough ball in half.
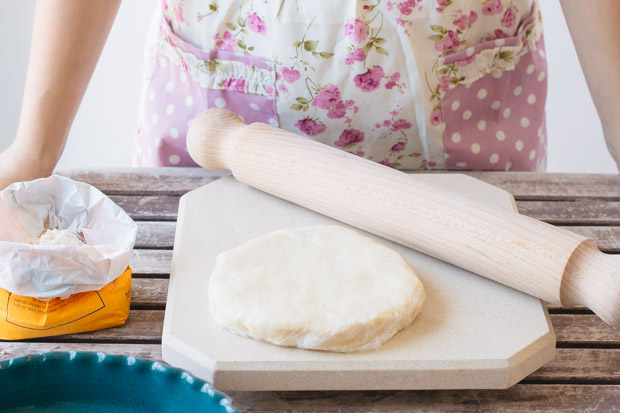
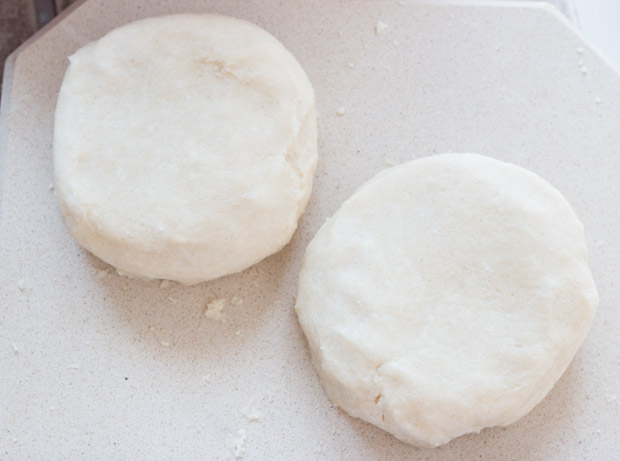
Flatten each one slightly with your hands to form a 1-inch thick disc.
Wrap each disc with plastic wrap.
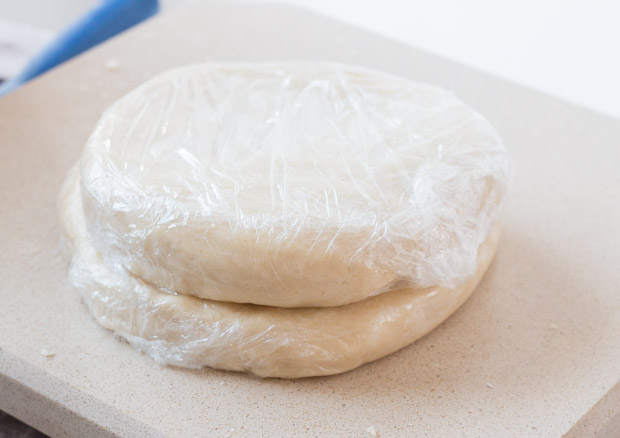
Refrigerate for at least 1 hour before proceeding with your pie recipe. If you don’t want to use the dough right away, you can refrigerate it or for up to 3 days or freeze it for up to a month, then thaw it overnight in the fridge.
My favorite recipes with perfect pie crust
- Caramel Apple Pie. Juicy, caramelized apples take this classic pie to new heights.
- Cherry Pie. A perfect summer pie that tastes divine.
- Pecan Pie. Perfect for Thanksgiving, nothing because this delicious classic pecan pie recipe.
- Apple Hand Pies. These perfect mini apple pies are not only fun to make, but look adorable and taste amazing.
- Caramel Pear Pie. Ripe pears and caramel sauce combined with buttery, flaky pie crust is the perfect combo.

Perfect Pie Crust
Buttery, crisp, crumbly, and flaky, this is a good old-fashioned pie crust recipe that tastes amazing with any filling.
Ingredients
- 2 ½ cups (350g) all-purpose flour
- 1 teaspoon salt
- 1-2 tablespoons granulated sugar
- 1 cup (2 sticks/227g) cold, unsalted butter, cut into small cubes
- ¼ – ½ cup (60-120 ml) very cold water
Instructions
-
Process flour, salt, and sugar in a food processor for a few seconds until combined (Instead of food processor, you can do the whole process by hand, using a pastry cutter). Add butter and pulse until mixture becomes crumbly and resembles coarse meal (different size of butter pieces or some large pieces is fine), about 15 pulses. Add ¼ cup water and keep pulsing, adding more water as needed, one tablespoon at a time, until the dough isn’t dry and starts to clump together. Do not process to the point that a large ball of dough is formed, rather the dough should be quite crumbly with large clumps. Another way to check if it’s done, is to take a piece of dough and press it between your thumbs – the dough should stick well together without feeling dry or crumbly.
-
Turn the dough to a floured surface and form into a ball. It should come together easily without being sticky. Divide ball to half, then flatten each one slightly with your hands to form a 1-inch thick disc. Wrap each disc with a plastic wrap and refrigerate for at least 1 hour before proceeding with your pie recipe.
-
If you don’t want to use the dough right away, you can refrigerate it for up to 3 days or freeze it for up to a month, then thaw it overnight in the fridge.


Dannii @ Hungry Healthy Happy says
Great photos!
You can’t beat homemade pie crust. I am craving apple pie now.
Shiran says
Thank you Dannii!
Lindsay @ The Local Taste says
This pie crust really does look perfect! I’m sure it tastes just as good…Yum!
Julie @ Lovely Little Kitchen says
Thank you for this tutorial! I really have trouble with pie crusts. The photos are beautiful, and I can’t wait for your tart recipe!
Shiran says
Sure! I’m here in case you need any help! 🙂
Lilli @ Sugar and Cinnamon says
Wow it literally does look perfect! Thanks so much for all the tips I can’t wait to try again using this recipe 🙂 By the way I love your blog!
Shiran says
Thank you so much Lilli! I love your blog too, it’s so pretty 🙂
Katie says
Hi! I’m actually about to start making this dough for your Caramel Apple Pie (canNOT wait to taste it!!!), but I’ve never made my own dough before… or a pie. ever. Anddddddd I don’t have a food processor.
I like to think I’m quick on my feet in terms of coming up with plan B’s, but I’m kind of stuck. =/
Any quick ideas, or than just driving to the nearest (not near) mall & grabbing a food processor?
Thanks!
Shiran says
Hi Katie! Food processor makes things easier, but of course you can make the dough by hand. Here’s a great video showing you how to do it. Just follow the technique shown there. Hope this helps 🙂 This pie is amazing and so worth it! Good luck!
Lori says
Use a pastry cutter. Easy!
Elina says
Hello,
I have read both of your recipes the “lemon tart” and “apple pie”. My question is why the apple pie crust is different than the lemon tart. Can I use them interchangeably?
P.S. I tried the tart dough. It was very delishh. i made it in small tart pans. Pierced the dough all over with a fork but didn’t weigh it with anything
Shiran says
There’s a difference in texture between the two. You can sometimes use them interchangeably but I suggest to stick to the recipes because the crust should complement the filling. Tart crust is crispy with a cookie-like texture, so it complements the lemon tart perfectly. Apple pie, however, goes better with the pie dough which is buttery and flaky.
Bernice Mosteller says
Do you have a crust recipe for hand held apple pies, that will hold together for deep frying. Every one that I try is too crumbly and falls apart when you put it in the oil.. I had a recipe at one time that turned out perfect and I lost it. Everyone that I have experienced with now does not hold together…Certain can biscuits can be used,,but they just don’t have the same taste…I would greatly appreciate any help that you can give me ! Thank you
Shiran says
Hi Bernice, I use my recipe for pie dough and it works fine. I’ve tried a few different recipes in the past, but the pies didn’t fall apart, so I can’t say for sure why it happens to you. You’re right, biscuit recipes are also great for this. You can try using shortening instead of butter which is more foolproof, or refrigerate the pies so they’re not too soft, and make sure that the oil is very hot.
Bernice Mosteller says
THANK YOU !!!
Shannon Burnett says
I really love this crust. I cut butter in flour with a knife then used fingers to smoosh together somewhat. Put in fridge about 2 and half hours cuz something came up…took out and let sit on counter about 30 min then have it a couple kneeds before rolling out. Flaky, buttery, yummy!!
Shannon Burnett says
I really love this crust. I cut butter in flour with a knife then used fingers to smoosh together somewhat. Put in fridge about 2 and half hours cuz something came up…took out and let sit on counter about 30 min then have it a couple kneeds before rolling out. Flaky, buttery, yummy!! I also layed a piece of aluminum foil over pie when turned oven down.
Roni Zagoria says
Hello! Is there any difference in the recipe for high altitude? I’m in Denver, CO.
Andrew Moore says
Made this and it worked really well. I baked a cherry pie in a large tart pan and the crust held up really well. Who needs a pie pan when you have a sturdy crust! The bottom crust was eve crisp.
debie says
i’ve made my pastry the night before. How long do I leave it out of the fridge before rolling in for the top and bottom.
debie says
I used this for my first ever pie crust. It was amazing. The bottom was really crisp and flaky. I had my own Cherry filing and followed your tips for keeping everything cold. My family loved it. Thanks for a great recipe.
Jess says
All I have is salted butter is there anyway I can alter the recipe so I can use the salted butter for my cherry pie crust
Shiran says
Hi Jess. If you use salted butter the crust might be too salty, so it’s better to stick to the recipe.
Jean says
First time making pie and followed your recipe for the caramel apple pie and it was yummy! Crust was so good. However, for some reason, my pie crust dough seemed too little to roll it out to 12” (it became a bit thin). Had to take some from the other half which meant I barely had enough for my lattice top. Any idea what went wrong?
Shiran says
Hi jean, the recipe makes exactly the amount needed with no extras, so sometimes it can happen, but it should be enough for a 9-inch pan. If you prefer thicker crust you can make some more dough next time just to be on the safe side.
Brooke says
Food processor is genus! It’s makes it so easy. I love this recipe. I’ve used for more than a year now. It’s my go to for dessert pies and chicken pot pie. 😋
Eva says
Hi there,
I truly love your pie crust recipe, so delicious!
I am about to bake the apricot/plum pie, do you have a recipe for the filling or could using your cherry pie filling work well?
Thank you!
Eva
Shiran says
Thank you Eva 🙂 I don’t recommend using the cherry pie filling, and I don’t have a recipe on the blog for apricot/plum pie yet.
bubbabugaloo says
When I took them out of the refrigerator they were hard as rocks. Do you have any idea what went wrong?
Stephanie @ Pretty.Simple.Sweet. says
Just let them soften at room temp for 10- 15 minutes and then use them. Butter hardens when it cools. It’s important to keep the butter cold for a nice and flaky crust.